DIY Corner // Wedding Dress Part 3 (+ lots of wedding pictures!!!)

Hey everyone!

Soooo….. I’ve been putting off this post for a while. I got married 2 weeks ago (woohoo!!) and I actually finished my dress a few weeks before that (yess!!!!) BUT to be honest, there were a bunch of pictures that I took during the process of the dress-making, and the final part of the dress was actually SUPER frustrating, SOOOOO as much as I ended up loving the dress, and I was really proud of how it turned out, I didn’t want to relive the whole thing again XD

But it’s necessary to. Because one day when I forget all about this, I want to have some form of documentation to look back on. And I also want to show you guys how everything worked haha. SO here goes nothing.

(Pssst…. if this is your first time hearing about my DIY wedding dress, make sure to check out post #1 and post #2!)

#1: Quick 30-second recap from Part 2

Last time I created the inside “structural” layers of the dress. All I had left to do was to create the top layer and then sew it together to the “structural” layers. Sounds easy right???

WRONG! (You’ll see in step 3 hahaha)

#2: Sewing the bodice and the skirt

I went about the next step in the process, which is cutting out the fabric for the outside layer bodice and the skirt and sewing everything together. This is the layer that everyone will see, so I had to make sure not to make any glaring mistakes!

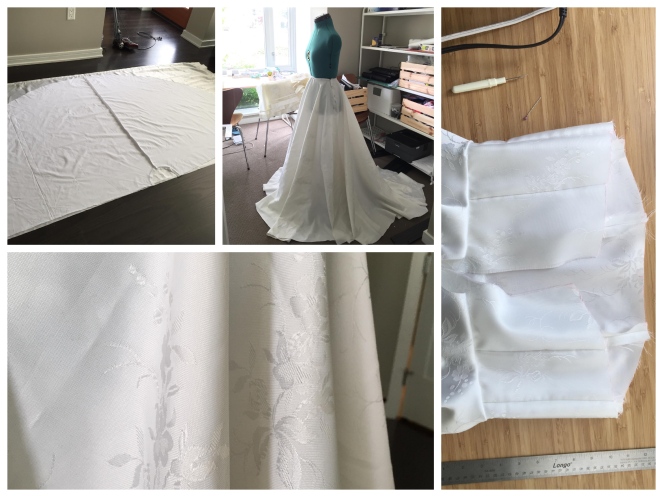
As you guys can see, the skirt is HUGE!I had to mark and cut the fabric on my living room floor because my table wasn’t big enough! You guys can also see a close-up of the embroidery on the fabric here.

*Pssst…… Did I tell you guys that this fabric is actually from a thrift store??! I saw two huge pieces of curtains that I thought looked very bridal, took a leap of faith and made the purchase hahahaha.

#3: Combining the inner and outer layers

Since I made the inner layer already (from post #2!) and finished the outer layer (previous step,) in this step, my goal is to combine the two layers.

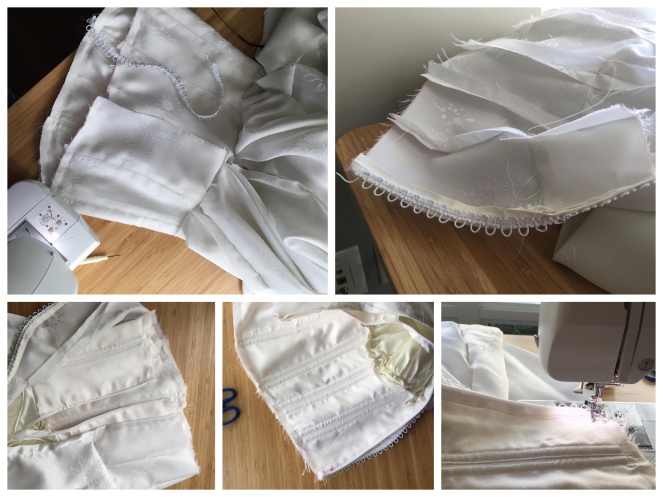
My plan was to join the two layers along two seams: the top seam; and the centre back seam (which contains the button loops and the zipper.) In the images below, you’ll see me sewing the button loops and the zipper to the centre back seam (a nightmare to do!!!)

Once the inner and outer layers are attached, this dress should be pretty much done right??? (You would think! But no!!)

Here’s what it looked like…. (Say “hi” to my dog Charles in the corner.)

…… And I didn’t love it. The high waist-line didn’t look flattering. You guys might not see this in the picture, but the fabric of the torso also tended to ride up, because of the horizontal tension and because the two layers were not fixed at the waist-line.

BOTTOM LINE IS…… I had to ALMOST start over. (THE HORROR!!!) I took apart the top layer AND most of the bottom layer, which involved undoing 50% of what I talked about in the previous post. This was the most frustrating part of the whole dress!!!

#4: Redoing the bodice

To better explain my change in approach:

Previous approach = (top + bottom of inner layer) + (top + bottom of outer layer)

New approach = (top of inner layer + top of outer layer) + (bottom of inner layer + bottom of outer layer)

I also decided to drop the waist-line so that it sits at my natural waist-line rather than an empire waist kind of look. (Why was I even thinking empire waist??!! IDK!!! *face-palm*)

I was able to reuse the pieces of fabric from the bottom outer layer of the dress, BUT I had to cut the inner outer layer of the dress again (because I skipped some steps last time. LESSON LEARNED: NEVER SKIP STEPS WHEN SEWING, it comes to bite you in the butt XD)

This time I also decided to sew an extra seam to fix the seam allowances which is a nice decorative details in the end. See? Sometimes doing things all over again leads to some overall improvements!! #positivity.

#5: Sewing the lining

This was an optional step. People probably won’t see the lining (which is the extra layer of fabric that is on the inside of many dresses, jackets, etc) unless they are the person wearing it. However it is important for two purposes:

  1. Comfort! For many heavier pieces of clothing, the outer fabric can be abrasive to your skin, so a soft and smooth fabric is typically used to line the inside.
  2. It looks better and more professional! No one wants to see seams and threads hanging out from the inside of their jacket or dress.

Of course, because I wanted the dress to be perfect, I decided to create a lining layer. Basically I traced out the same pattern for the bodice as the top inner and outer layers. For the bottom, I used a smaller piece of fabric because it did not need to be a full circle skirt.

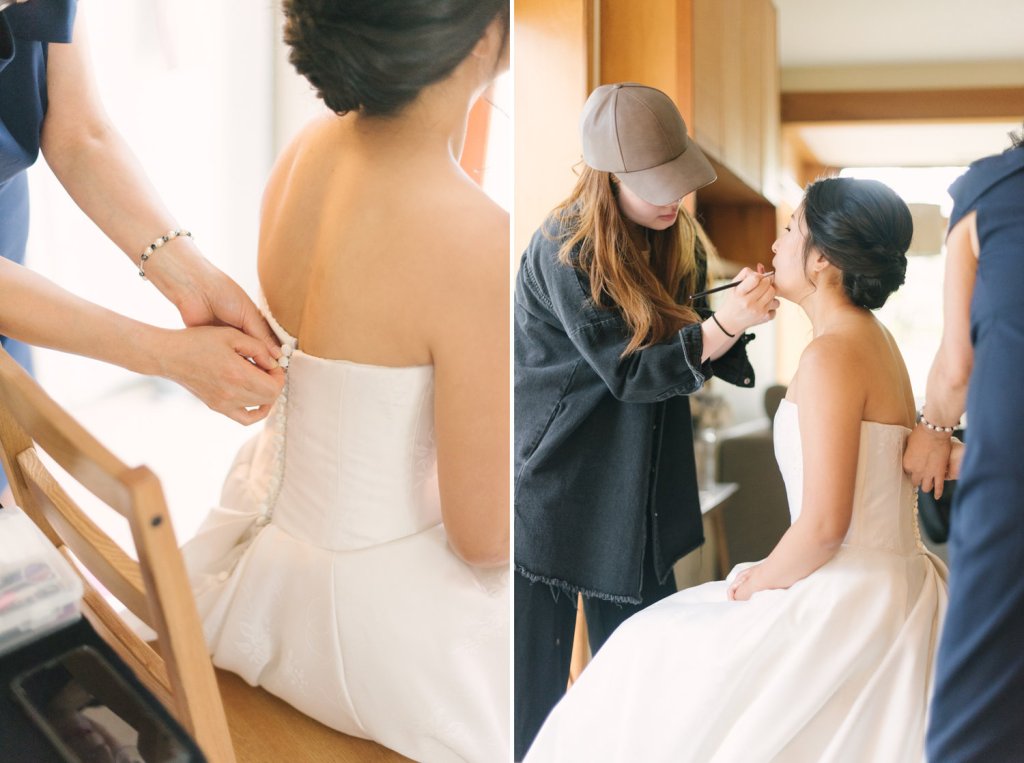
#6: Putting it all together! (Again!)

OK. I apologize because I reallllllly didn’t take many photos here hahaha. I think at this point I really wanted to be done (and I was ready to hurl the sewing machine AND the dress out the window!! except I didn’t, because at this point I had no other wedding dress to wear and because the sewing machine was expensive hahahah)

My task for this step was to combine the inner, outer, and lining layers, as well as several layers of tulle in between the bottom layers of the dress to add volume and create a ballgown shape.

Here’s my formula!

  • Top section = Outer layer + inner layer + lining
  • Bottom section = outer layer + tulle + inner layer + lining
  • Then top section + bottom section + zipper + button loops (this is probably the hardest part because of the large amount of layers to sew through, and the need to make sure everything lines up!)

I used two (or three! honestly I don’t remember!) layers of tulle from the old wedding dress I purchased from the thrift store. I thought I would use more of the old wedding dress BUT in the end these two layers of tulle was all that I ended up using hahaha.

On the plus side I REALLY loved how the buttons and the button loops turned out. Many dresses have a row of fake, nonfunctional buttons (that are just sewn onto the fabric and do not require button loops)……. but because I am extra (and because I wanted the dress to look awesome and professional!!!) I decided to do real buttons and button loops in addition to a zipper. The zipper is what holds the dress in place. The buttons just look nice. It was a LOT of work but totally worth it.

#7: Before I forget! The hem!!!!

The hem is the seam that goes around the entire circumference of the skirt. Basically we want to sew the fabric to: 1) prevent fraying, and 2) look nice and polished! Usually the hem is the last step to complete.

I’ve sewn hems before so I thought this is going to be easy-peasy after the entire dress is done!! I completely underestimated this step hahahaha.

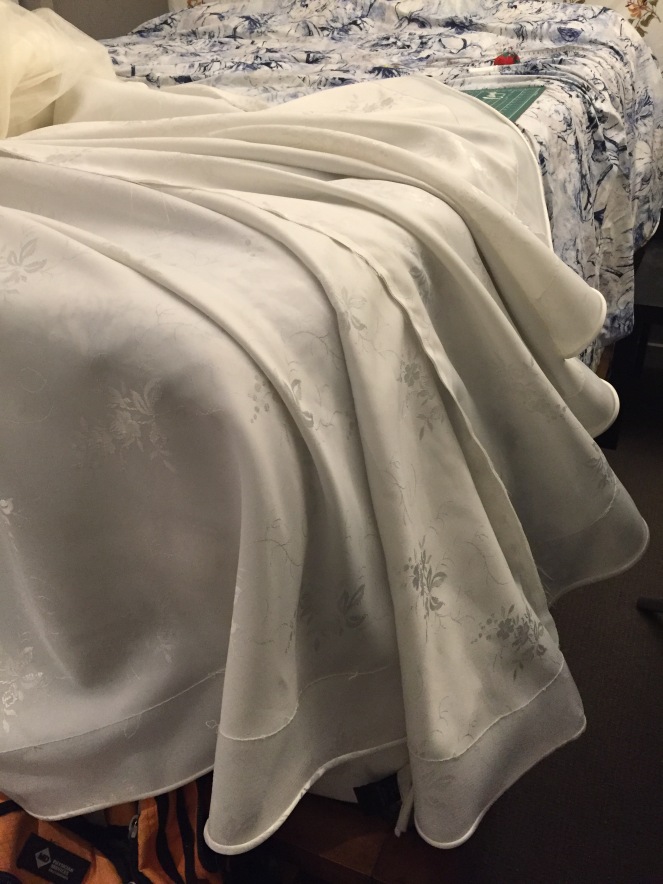
I decided to use horsehair braid (don’t worry, they are made of polyester- no horses were harmed in the process!) This is a type of fabric that is used stabilize the hem and give it more shape. The downside is that it pretty much has to be hand sewn, especially for a curved hem such as the circle skirt I have for my wedding dress.

And guess how long the hem is??!!!

9 METRES!

YES, this meant 9 metres of hand-sewing hahahah. I think I spent 5 hours or more just on the hem. (Audiobook entertainment? Red Rising by Pierce Brown and LOTS of writing videos on Youtube haha.)

Here is what the hem looks like (inside.)

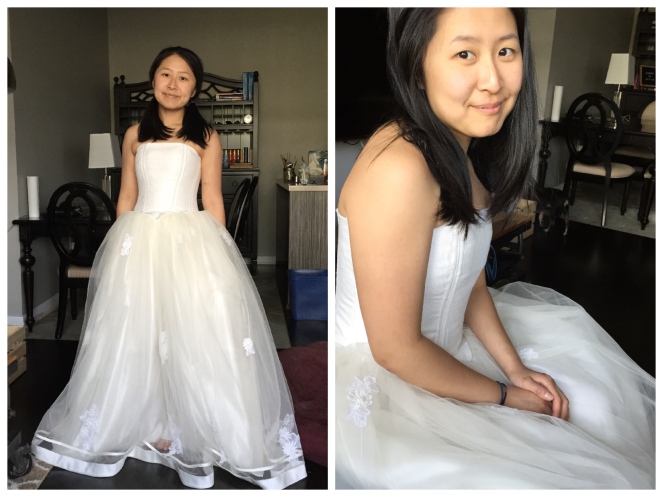
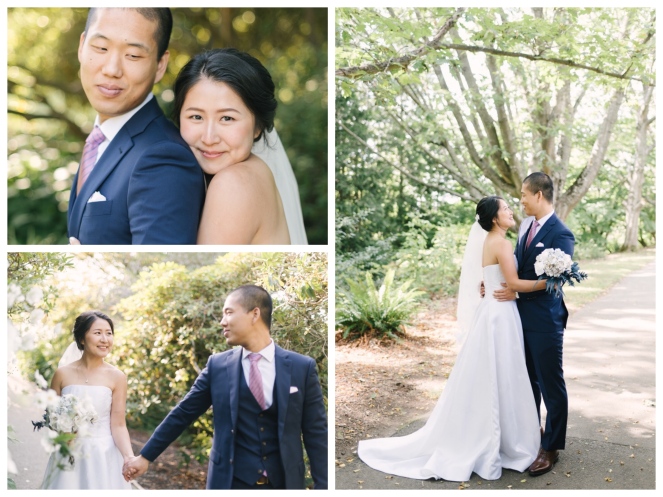
#8: Ta-Da! The final product!

Doing up the buttons!! (Thank you mom!)
Yes that’s my To-Bring List haha (Sewing kit is on there! Just in case emergency stitches are needed!)
In line for ice cream!
I LOVED how the train turned out!! By the way, did you know this bouquet was also a DIY?! (made from 100% origami!!!)
Our cake artist did an amazing job!! Yes those are origami flowers!!
Some of our DIY table decorations: mason jars, origami, and old books!! (Because we love reading, of course books made it into our wedding theme!)

49 responses to “DIY Corner // Wedding Dress Part 3 (+ lots of wedding pictures!!!)”

  1. Omg this turned out beautiful! ❤️❤️ I was proud of myself for simply adjusting a strap on my wedding dress 😂 I can’t even imagine sewing my own!!

    Liked by 1 person

    1. Thank you so much!! Haha this was definitely a huge amount of work and I am so glad that it turned out well. :’)

      Like

  2. I’m glad to hear that you were happy with how everything turned out… in the end.
    You surely put a spin on everything with the DYI dress, bouquet and table decorations.

    (Side note: Did you mean sweing KIT, not list?)

    Liked by 1 person

    1. Thank you so much!!! And YES I meant sewing KIT hahaha and it’s fixed now. You have a great eye 🙂

      Liked by 1 person

  3. Congratulations! Thank you for showing us your dress making process and some pictures. That’s so fascinating and it looks beautiful on you!! I absolutely love that color and it’s my favorite! I absolutely love how you made your bouquet!

    Liked by 1 person

    1. Thank you Stephanie!! I am so glad to hear that you liked the look of the dress and the bouquet!

      Liked by 1 person

  4. Wow you’re insanely talented! I took 3 months to finish an embroidery thing meant for age 5+, not my proudest moment. Also the picture with the ice cream van is honestly goals!

    Liked by 1 person

    1. Thank you so much!! It’s pretty awesome that you do embroidery! I did want to add some beading to my dress (buuuuut chickened out at last minute haha- it just seemed too difficult!)

      Liked by 1 person

  5. This is absolutely amazing!! You should be so proud and the end result is beautiful!! It sounds like a lot of hard work and effort went into this dress but it definitely looks worth it. I love the buttons too, I think they have such a lovely touch and look great. I love the fabric and colour too — I can’t believe you used curtains. That’s amazing!!
    The dress looked amazing and you looked beautiful!! Congratulations– thank you for sharing all the photos!! BTW I love the ice cream van and the origami flowers. The table decorations are lovely too 😍😍 it all looks wonderful!!

    Liked by 1 person

    1. Thank you so much Sophie!! I’m glad that you liked the look of it haha. Yeah it’s a funny story with the curtains: my parents and my in-laws didn’t realize I made my dress with old curtains, and when they found out 2 days before the wedding, they were horrified (this was before they saw the dress!) BUT in the end when they did see the dress they loved it XD
      Glad that you liked the ice cream van picture- it’s a fav of mine too! Thanks again!!

      Liked by 1 person

      1. Yes it looked incredible!! Haha wow, I guess it would be a surprise to hear it was curtains but I’m glad they liked the end result– how could they not!!
        It’s a lovely picture!! You’re welcome!! ❤

        Liked by 1 person

  6. This is so precious! I love everything about it. Wow, seems like a beautiful wedding. Congrats.

    Liked by 1 person

  7. This is so amazing!
    Your dress is beautiful and the decor and the photos – the ice cream truck is so cute!
    I am so glad you had an amazing day (even if you had to unpick your dress most of the way).
    I am wishing you both the very best for the rest of your adventures together!
    – Emma 🙂

    Liked by 1 person

    1. Thank you Emma! Yes the ice cream truck pic is one of my favourites too! 🙂 The wedding dress was a lot of work but definitely worth it in the end!

      Liked by 1 person

  8. So beautiful!! You struggled and you overcame Sophie!! ❤ Your dress is amazing and you should feel so proud that you made it yourself (even through all that frustration!) and your bouquet is gorgeous too, I thought it was real flowers!

    Liked by 1 person

    1. Thank you so much Jai Lynn!! Even though the dress was lots of hard work, it was worth is in the end XD Glad to hear that you liked the bouquet too, and that you thought it was real flowers!! I’ll have to pass it on to my hubby (he made the bouquet!)

      Liked by 1 person

  9. Amazing photos. That’s some serious talent and congratulations on your marriage. Wishing you both many happy years ahead!

    Liked by 1 person

    1. Thank you Lisa!!! 🙂

      Like

  10. You did such an amazing job on your dress! You looked beautiful. And I love your dog!

    Liked by 2 people

    1. Thank you so much!! Haha yes my dog Charles is adorable and always makes cameos in my photos 🙂

      Liked by 2 people

      1. Dogs make me smile. I love when I see them pop up on blogs.

        Liked by 2 people

      2. Haha yes dogs are really cute!!

        Liked by 2 people

  11. It turned out beautiful and you looked like you were glowing in those photos! I would never have guessed the fabric was from a thrift store! Congrats again, Sophie 🤗!
    (Also, Charles is AMAZING.)

    Liked by 2 people

    1. Thank you so much Belle!! Haha yes Charles is adorable, always photobombing everything 🙂

      Liked by 1 person

  12. Wow your dress is absolutely beautiful!! Congratulations on your wedding and thank you for sharing photos!💛

    Liked by 2 people

    1. Thank you so much Emme!! 🙂

      Like

  13. The dress looks absolutely amazing! It’s so detailed and looks professional. I can’t believe that part of the fabric came from curtains. Id never be able to do something like that. I can make dog bandanas and I’ve made cushions in the past but that’s about it (and I had to get my mum to figure out what was wrong with the sewing machine as the needle kept breaking -_-) id never have had the patience to redo so much. It looks so worth it though. All of your wedding photos are lovely.

    Liked by 2 people

    1. Thank you Charlotte!! It really was a lot of work haha. Before this dress, I’ve mostly sewn simple pieces like skirts, napkins, etc, so this is definitely my most complicated project to date! Youtube videos helped a lot, and it was great that I had a fairly new sewing machine 🙂 Thank you!!

      Liked by 1 person

      1. Wow that’s a big leap to make but so worth it and absolutely fantastic that you managed it.

        Liked by 1 person

  14. The dress is so beautiful!! You looked incredible!! 😀

    Liked by 2 people

    1. Thank you Orang-utan Librarian 🙂

      Like

  15. Wow!! So much hard work but also such a stunning end result! I’m glad we get to see photos of the details on the dress. They really add a special touch to the material. Oh and I too am not a fan of empire waists XD

    Liked by 2 people

    1. Hey Haidan!! Wow thank you! I’m glad that you like how it turned out! This means a lot coming from another craftster!! 🙂

      Like

  16. The dress came out so beautifully! I truly admire you for pouring so much of yourself into working on the dress! You look absolutely stunning, Sophie! ❤

    Liked by 1 person

    1. Thank you so much Kelly!!! I am so glad that you liked how this dress turned out!! 🙂

      Liked by 1 person

  17. You are beautiful! You are so amazing to have created your own wedding dress and from a thrift store find! Wowza! Many blessings upon you and your husband.

    Liked by 1 person

    1. Thank you Stefanie 🙂 It was a lot of work but definitely worth it in the end!

      Like

  18. Gorgeous!! I always wanted to make mine but I chickened out – you did an amazing job!

    Liked by 1 person

    1. Thank you so much!! Haha it was a pretty hectic time and I am glad that I won’t have to go through all of that again 🙂

      Like

  19. […] Sophie @Sophie’s Corner– Sophie is extremely multi-talented. Her blog is full of entertaining posts and tags on books, writing and crafts. And when I say multi-talented, I mean it (guys, she made her own wedding dress and looked stunning!!) […]

    Like

Leave a comment