DIY Wedding Dress Part #2

Hey everyone!!

So it’s been a while since I last posted about my DIY wedding dress, and YES my friends, it is still happening!!

(Psssst….. This is the second post in my Wedding Dress series. If you are curious about what I did up until now, check out my first post here!)

Today I want to share with you guys my progress so far. If I were to describe it using words… it’s been stressful and there were times when I really wanted to pull my hair out and throw my dress and sewing machine out the window but thank goodness I didn’t do that hahahaha. Nothing beats the feeling of meeting a challenge and then finding a solution, which is why I do half the things I do 🙂

And yes! There are pictures! I’ll show you guys some of the progress pics that I’ve taken along the way. Unfortunately sometimes I am so impatient so I didn’t take photos of all the steps. Also, this post isn’t intended to be instructional (I don’t think I am not qualified to do any sewing instructing hahahah), rather just to give you guys a visual of how my wedding dress is made 🙂

#1: I laid out my wedding dress bodice pattern that I made previously.

(Note that I already tested this pattern out using thin muslin-like fabric so I know that it fits me well!)

This time since it is for the real deal, I decided to go with a canvas-type fabric, which I heard is good to use for corsets and bodices. Another option is corset coutil, however it is a bit more expensive and also not available where I am from. Canvas doesn’t look as nice however this is going to be the inside layer so no one is going to see it. (Aka. I totally cheaped out and this came to bite me later hahahah)

After cutting out the fabric, I joined the pieces together. I made two of these so that they can be combined together.

#2: I sewed the two pieces of the bodice, wrong sides together.

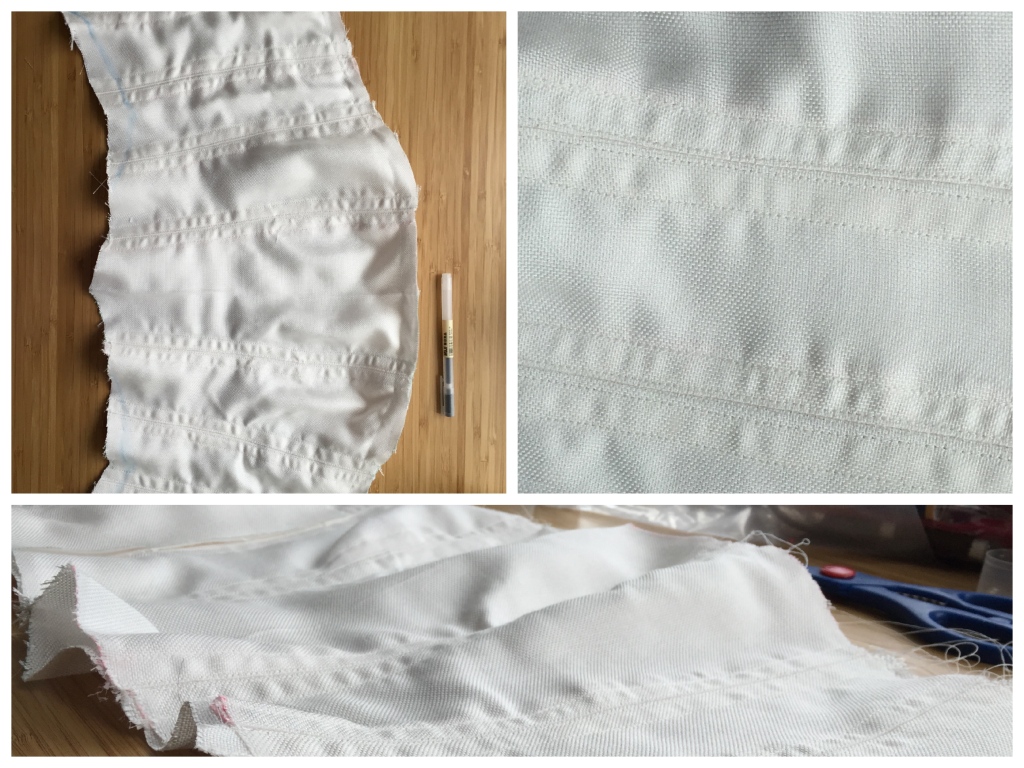
As you can see, I made four rows of stitches per panel. This also creates the boning channels (ie. the tracks or pockets where the boning will go!)

This was a really time-consuming step, so it was an excellent opportunity to put on a good audiobook. I believe I was listening to Girls of Paper and Fire at this time which made time fly by 🙂

This is also the point where I regretted using the canvas fabric. You see how the edges are frayed? The fabric actually frays SUPER easily. I was worried that the fabric will unravel as I walk down the aisle and I had a panic moment haha. Later I found that the solution was to paint the edges with a glue-water concoction, which was a good work-around :’)

#3: The fun part! Time to prepare the boning!

What is boning? Great question! I did not know that these things existed until I looked into making wedding dresses hahaha.

If you’ve ever tried on wedding dresses or costumes, you may notice that, in certain cases (but not always), the bodice is pretty heavy. That’s because there are these metal pieces that help keep the shape of the bodice. These days there are wedding dresses that do not require boning, however if you want a ball-gown shape dress (like me!) then boning is essential.

Why use boning? If you stretch a piece of fabric taut, you may notice that horizontal creases appear. This can be unflattering especially on a wedding dress bodice. However to prevent this, while still having a very fitted dress, you can insert boning along the seams which will eliminate the horizontal lines (because of some complex physics phenomenon which I cannot explain.)

In the top two pictures, I measured the lengths of each of the boning channels. Then it was time to cut the spiral boning and apply the tips. I was super excited for this step since it meant I could pull out my old jewellery-making wire cutters and pliers again (hello transferable skills!!!) However little did I know, corset boning is actually VERY tough to cut. I ended up enlisting my fiancé’s help for his grip strength haha.

#4: Inserting the boning into the channels…

I got way too excited after the boning is finished haha, so I completely forgot to take in-progress pictures here. However here is me wearing the completed bodice in front of the bathroom mirror.


Just want to let you guys know that this is the inner layer of the bodice. As you guys might notice, the fabric is rough and plain, perfect for providing structure. However I will be adding a prettier layer on top!

#5: Lastly I attached the bodice to the petticoat.

If you guys remember, I bought an old wedding dress from a thrift store for $50. Although I really was not a big fan of the off-yellowish colour or the embroidery (which looked all right from afar but very cheap up close), I did like the shape of this dress. I also knew that petticoats are super duper painful and difficult to sew XD

So what I did in this next step was to detach the top from the bottom, and sew the bottom petticoat to my self-made bodice:

#6: The progress so far!

This is what I have so far. It looks like the finished product but it isn’t- not yet!!

My intention is that this is the inner layer of the dress which will provide the structure (a well-fitted top and a ball-gown shaped bottom.) Next step is to sew the outer layer of the dress, which will be an opaque fabric with pretty floral embroidery! I’ll also be sewing some fancy bridal buttons onto the back!

Are you working on any DIY projects at the moment? What do you like to do as a hobby?

29 responses to “DIY Wedding Dress Part #2”

  1. OMGosh, you got mad skillz. Everything looks terrific.

    Liked by 1 person

    1. Thank you Stefanie ❤ 🙂 This means a lot coming from a fellow crafter!! Which projects are you working on now? 🙂

      Liked by 1 person

      1. Hi Sophie. Been busy here. Sorry. For knitting I’m working on my Harry Potter shawl and a pair of child-sized mittens for a fall charity drive. I’ve started a Harry Potter cross stitch for my tween’s teacher as this is the last contained classroom she’ll be in. She’ll be moving to junior high in the fall. If you are curious to see how they look, pls drop by the blog at your convenience.

        Liked by 1 person

      2. Sounds like you have lots of Harry Potter DIY on the go. I’ll come by your blog and take a look 😀

        Like

  2. AHH SOPHIE your dress already looks stunning, I admire your patience for doing all of this ❤ I can't wait to see the final result! 😀

    Liked by 1 person

    1. Thank you Marie ❤ ❤ I really appreciate your encouragement 🙂 Yes I will keep you guys posted about my progress!

      Liked by 1 person

  3. This is a brilliant post Sophie! 🙂 ❤ I think it's really great you managed to stick with the whole making your own wedding dress aim, especially when you were a little discouraged (I'm the kind of person who gives up the second I get a little discouraged so honestly I really admire that you didn't). It will all be worth it at the end when you're done I'm sure, and this way you get your dream dress because you can make it exactly as you want it.
    You've made such a lot of progress, and already it looks amazing. Seriously well done, and I can't wait to see the finished dress (which I'm hoping you'll be sharing photos of). 😀

    Liked by 1 person

    1. I am a bit stubborn so it’s hard for me to give up on something haha 🙂 I am glad that the dress is panning out so far! Thank you so much for your kind and encouraging words ❤ ❤ Yes I will share more photos as I make more progress on the dress!

      Liked by 1 person

      1. I mean, I can be the same, too stubborn for my own good, but a lot of the time it’s outweighed by my laziness. I can never win. 🙂
        That’s all right, and I look forwards to seeing more progress posts. 🙂 ❤️

        Liked by 1 person

  4. It looks so good!

    Liked by 1 person

  5. IT’S SO BEAUTIFUL! The dress looks amazing so far, and I think it’s incredible how you’ve been doing all this! I can’t wait to see the finished dress! 😍

    Liked by 1 person

    1. Thank you Kelly!! So glad to hear that you’re liking the dress so far 🙂 I’ll keep you guys posted about the progress!

      Liked by 1 person

  6. This looks so beautiful so far 😱 I’m still so impressed that you’re undertaking this project, and it looks like you’re doing an amazing job so far! Good luck with the rest! 😄

    Liked by 1 person

    1. Thank you Margaret for your sweet words 🙂 So glad that you’re liking this dress so far!! 🙂

      Like

  7. Ahh… it is so nice to see your progress!! And it is looking AMAZING!! ❤ it is always a nice feeling when you complete something you found challenging!! 😊 well done on doing this all– it’s a real skill and the results are looking great!! I look forward to seeing the finished dress!! ❤

    Liked by 1 person

    1. Thank you for your encouragement Sophie! It means a lot to me ❤ 🙂 I'll keep you guys posted!

      Liked by 1 person

  8. Great post. I made wedding dress. Well I bought the basic frock which was used really cheap and a seamstress added a little too it. Boy did it turn out wonderful! Was so please.

    Liked by 1 person

    1. That’s awesome that you made your wedding dress as well. I would love to see a photo if you don’t mind sharing! It is awesome to have a touch of DIY on our wedding day 🙂

      Liked by 1 person

      1. I wouldn’t go so far as to say I made it more had it altered by someone else l 😀 might avoid sharing a photo though as that is one thing I was not happy about our wedding and that was the DIY photography. Not too comfortable on that one….sincere apologies.

        Liked by 1 person

      2. No worries, that’s totally okay haha. That’s cool that you had your dress tailored though 🙂

        Liked by 1 person

  9. Incredible that you’re making your own wedding dress and it looks amazing so far!!

    Liked by 1 person

    1. Thank you so much!!! I’m so glad that you like how the dress looks so far ❤ 😀

      Liked by 1 person

  10. thebookofjess7504 Avatar
    thebookofjess7504

    It looks beautiful!!!! You’ll look amazing on the big day!

    Liked by 1 person

    1. Thank you Jess 🙂

      Liked by 1 person

  11. […] Life was very, superbly manageable this month. Work wasn’t too busy so I had plenty of time to spend on my hobbies. Wedding planning is slowly rolling along. I am glad to see that some fo the details are beginning to pan out. Here is my wedding dress update 🙂 […]

    Like

  12. […] I GOT MARRIED! Yes, this means that I finished my DIY wedding dress (post #1; post #2; and YES there will be a final post about this soon!! I’m just waiting for the full set of […]

    Like

  13. […] (Pssst…. if this is your first time hearing about my DIY wedding dress, make sure to check out post #1 and post #2!) […]

    Like

Leave a comment